
Table of Contents
- Best Ways to Hang Posters Without Damaging Walls
- Poster Framing Guide for Beginners
- Gallery Wall Layout Ideas for Visual Balance
- Leaning and Ledge Display Techniques
- Lighting and Glare Management
- Preserving Your Artistic Posters Long-Term
- Conclusion
Last Updated: August 12, 2026
Best Ways to Hang Posters Without Damaging Walls
Hanging artistic posters shouldn't mean sacrificing your security deposit or repainting walls before you move out. The challenge is finding methods that work for both renters and homeowners without leaving permanent marks.
Command strips have become the standard for damage-free hanging because they hold weight without adhesive residue. For posters under 2 pounds, standard strips work easily. Heavier framed pieces require heavy-duty versions, which distribute weight across a larger surface area.
The key to success is wall preparation. Clean the wall with a dry cloth first to remove dust and moisture. Temperature matters too, strips adhere best when applied in rooms between 50°F and 85°F. If your space runs cold or humid, wait for conditions to normalize before hanging.
Command Strips and Adhesive Solutions
Command strips come in multiple weight ratings. Standard strips hold up to 1 pound per strip, while heavy-duty versions handle 3 pounds each. A 24-by-36-inch poster in a lightweight frame typically needs two strips minimum, one at each top corner.
Press each strip firmly for 30 seconds after placement. Wait at least one hour before hanging anything, the adhesive needs time to set. When removal time comes, pull the strip straight down slowly rather than yanking it away from the wall.
Other adhesive options exist beyond command strips. Double-sided poster tape works for temporary displays under 1 pound. Blu-Tack and similar reusable adhesives are damage-free but tend to dry out over months.
Poster Clips and Hanging Hardware
Poster clips offer a completely adhesive-free approach. These spring-loaded frames grip the top and bottom edges of your poster, then hang from a single nail or hook. Installation requires only a single nail hole, making this the most landlord-friendly method available.
Poster clips work best for standard rectangular posters without frames. The clips grip paper edges firmly without creasing or damaging the print. When you move, fill one small hole instead of dealing with multiple adhesive residue spots.
Poster hangers, wooden or metal rods that slide through a sleeve at the top, create a gallery-like presentation. These require wall-mounted brackets but distribute weight evenly across the top edge. This method works particularly well for displaying artistic posters in series.
Washi Tape and Temporary Methods
Washi tape offers a completely reversible hanging method that adds visual interest. The decorative tape becomes part of the aesthetic, framing the poster edges. Unlike standard masking tape, washi tape peels away cleanly without leaving adhesive residue.
Apply washi tape across the top corners and along the sides where the poster meets the wall. The tape holds lightweight posters (under 2 pounds) securely while remaining fully removable. Washi tape works best for posters on clean, dry walls with matte paint finishes.
This method suits temporary displays, seasonal decorations, and rental situations. Select colors and patterns that complement your poster and room aesthetic. Mind Eracing Studio's character-driven artistic posters pair particularly well with complementary washi tape colors.
Poster Framing Guide for Beginners
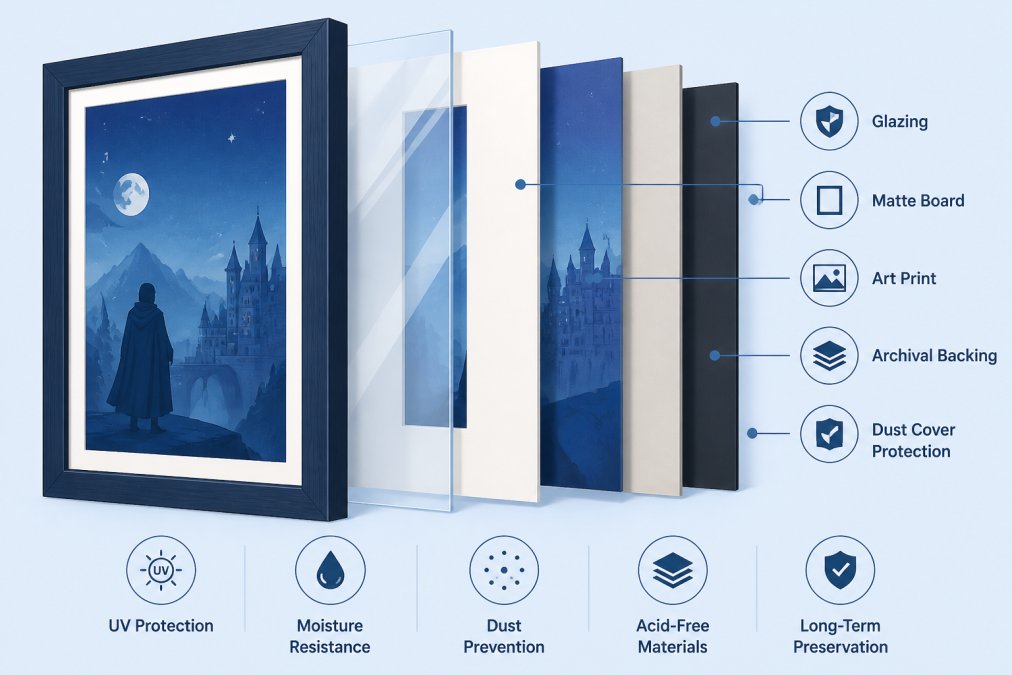
Framing transforms a poster into a protected artwork that lasts decades. A basic frame consists of four elements: the frame itself (wood or metal), matting (optional but recommended), glazing (glass or acrylic), and backing. Each component serves a specific function in protecting and displaying your poster.
The frame provides structure and aesthetic context. Wood frames offer warmth and traditional elegance. Metal frames feel contemporary and clean. A character-inspired artistic poster from a classic fable might benefit from a wood frame, while modern interpretations work with minimalist metal frames.
Choosing Matte Boards and Glazing
A matte board sits between the poster and glazing, creating visual separation that prevents the artwork from touching the glass directly. This contact causes deterioration over time.
Matte boards come in various thicknesses and colors. Standard 4-ply boards work for most posters. The color choice affects how viewers perceive the artwork, white or cream mattes create clean, contemporary looks, while colored mattes add personality. Cutting a matte properly requires precision. Many frame shops offer matte-cutting services at reasonable costs.
Glazing refers to the transparent protective layer, either glass or acrylic. Glass provides superior optical clarity and scratch resistance. Acrylic weighs less and breaks less easily, making it safer for households with children or pets.
Archival Quality and UV Protection
Archival-quality materials preserve posters for decades without yellowing or deterioration. Acid-free matting prevents chemical degradation that causes yellowing and brittleness. If you're framing something you plan to keep for decades, archival materials are essential.
UV-protective glazing blocks ultraviolet light that fades colors and damages paper. This is especially important for posters displayed near windows or in bright rooms. Standard glass blocks some UV light, but UV-protective glass or acrylic blocks up to 99% of harmful rays.
The complete archival setup includes acid-free matte board, UV-protective glazing, acid-free backing, and archival-quality mounting tape. This combination preserves your poster for 50+ years.
Gallery Wall Layout Ideas for Visual Balance
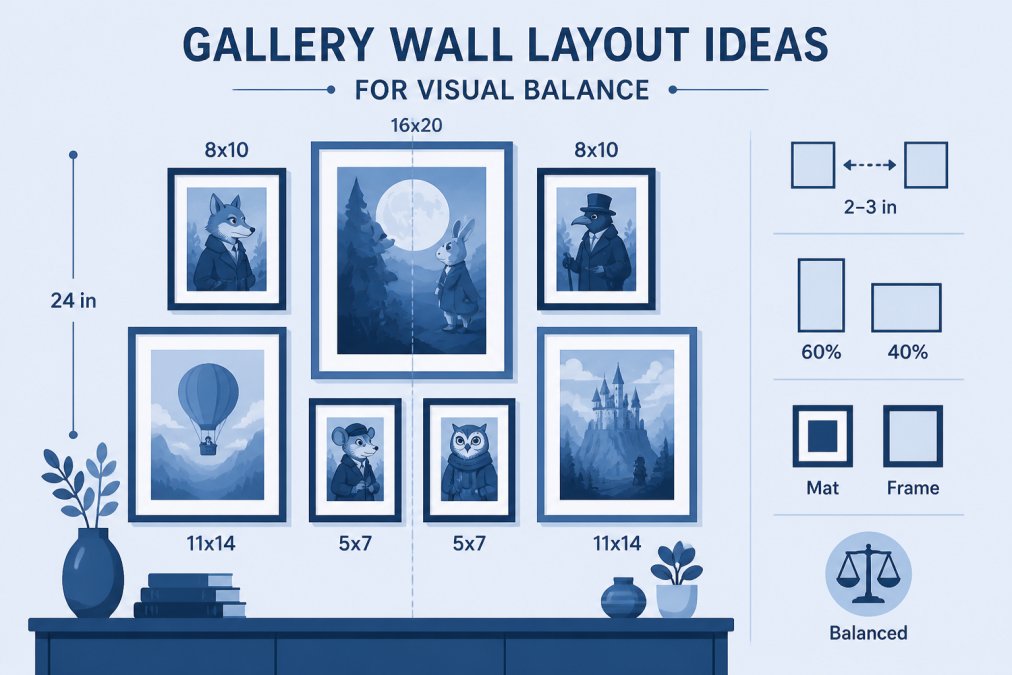
A gallery wall arranges multiple posters to create unified visual interest while maintaining balance and harmony. The arrangement transforms individual pieces into a cohesive installation that anchors a room.
The first decision is whether to pursue symmetrical or asymmetrical arrangement. Symmetrical layouts create calm, formal aesthetics with pieces mirroring across a center axis. Asymmetrical arrangements feel dynamic and collected. Both approaches work; the choice depends on your room's style.
Creating Symmetry and Alignment
Symmetrical gallery walls use a central axis, either vertical or horizontal, to organize pieces. This approach works particularly well in formal spaces or above furniture like sofas.
Use painter's tape to outline where each frame will hang before installing any hardware. This dry-run prevents mistakes and lets you adjust spacing before committing. Consistent gaps between frames create organized, intentional appearance. Most designers recommend 2-3 inches between frames for balanced spacing.
Mixing Sizes and Orientations
Varying poster sizes creates visual interest while maintaining overall balance. A common approach combines larger anchor pieces with smaller supporting prints. The largest piece typically goes in the center or at a prominent position.
Orientation mixing, combining vertical and horizontal posters, adds dynamic energy. Alternating orientations prevents monotony and works well for displaying diverse character-inspired artistic posters. When mixing sizes and orientations, maintain visual balance by distributing visual weight.
Leaning and Ledge Display Techniques
Leaning posters against walls or on shelves offers flexibility without permanent hanging. This method works beautifully for renters, frequent redecorators, or anyone hesitant about wall commitment.
The technique requires posters in frames or with backing boards for stability. Lean the frame at a slight angle, approximately 15 degrees from vertical, for visual interest while maintaining balance.
Ledge displays work best on floating shelves, mantels, or wide windowsills. Layer frames at different depths by placing some upright while leaning others at angles. Include varied frame styles and sizes to create a collected, intentional arrangement.
Lighting and Glare Management
Proper lighting transforms how viewers experience artistic posters. Poor lighting can make vibrant character-driven designs appear dull or washed out.
Natural light is free and beautiful but unpredictable. Direct sunlight causes fading and creates harsh glare. If your posters receive direct sun, UV-protective glazing becomes essential. Consider using sheer curtains to diffuse harsh light.
Artificial lighting gives you control over intensity and direction. Picture lights mounted above frames direct light downward across the artwork, creating dimension and reducing glare. Avoid lighting that creates reflections in glazing; position fixtures to the side rather than directly in front.
The color temperature of lighting affects how colors appear. Warm light (2700K) creates intimate, traditional atmospheres. Cool light (4000K+) feels contemporary and bright. Match your lighting temperature to your room's overall aesthetic.
Preserving Your Artistic Posters Long-Term
Long-term preservation requires understanding how environmental conditions affect paper and ink. Temperature fluctuations, humidity changes, light exposure, and air quality all influence how your artistic posters age.
Humidity is the primary threat to poster longevity. High moisture promotes mold and causes paper warping. Low humidity makes paper brittle. Ideal conditions maintain 30-50% relative humidity. Avoid basements and bathrooms that fluctuate too much. Interior walls away from exterior walls maintain more stable humidity.
Temperature stability matters as much as humidity. Avoid hanging posters near heat sources, air conditioning vents, or windows where temperature swings dramatically. Never hang valuable pieces in kitchens or bathrooms where steam and temperature changes are constant.
Light exposure causes irreversible fading. Even indirect sunlight fades colors over years. UV-protective glazing blocks most harmful rays, but limiting overall light exposure extends preservation further. Rotate displays seasonally if possible, giving pieces rest periods away from light.
Air quality affects paper and ink stability. Archival framing with sealed backing prevents dust from reaching the poster. Acid-free materials ensure nothing inside the frame damages the artwork.
Storage for posters not currently displayed requires similar care. Keep them flat in archival boxes in cool, dry spaces. Never store posters in basements, attics, or garages where temperature and humidity fluctuate wildly. If you must roll a poster temporarily, use archival-quality tubes and acid-free tissue.
Displaying artistic posters effectively combines practical installation methods with preservation principles that protect your investment. Whether you're renting and need damage-free solutions or creating permanent gallery walls, the methods covered here let you showcase your collection with confidence. Mind Eracing Studio's curated character-inspired artistic posters deserve display methods that honor their quality and artistry. Start with proper hanging techniques, invest in archival framing for pieces you treasure, and maintain stable environmental conditions. Your walls will showcase beautiful artwork while your posters remain vibrant for years to come.
Frequently Asked Questions
What is the 57-inch rule for hanging posters?
The 57-inch rule is a standard guideline for hanging art at eye level. Measure 57 inches from the floor to the center of your poster or gallery wall arrangement. This height works well in most rooms and creates a natural focal point. For rooms with higher ceilings or when hanging art above furniture, adjust slightly upward, but keep the center point as your reference to maintain visual balance and create a cohesive gallery wall layout.
How do you prevent posters from curling or fading over time?
Store and display posters using archival-quality framing materials, including acid-free matte boards and UV-protective glazing. Avoid direct sunlight exposure, which causes fading over months. Use proper mounting techniques with archival adhesive or mounting corners rather than tape. Keep posters in climate-controlled environments away from humidity and temperature fluctuations. High-quality satin and matte print options from reputable sources resist fading better than standard paper. For valuable prints, professional framing with conservation-grade materials is worth the investment.
Should posters be framed or unframed for a professional look?
Both framed and unframed posters can look professional depending on your aesthetic and the poster's quality. Framing with a matte board and glazing adds formality, protects the print, and creates a polished gallery feel. Unframed posters using poster clips or hangers offer a modern, minimalist look and work well for temporary displays or rental-friendly arrangements. For artistic posters with character-driven designs, framing elevates the presentation and emphasizes the artwork as a focal point. Choose based on your room's interior styling and whether you want the poster to feel like a permanent art collection or flexible wall decor.
What is the best way to create a gallery wall with posters?
Start by planning your layout on paper or using a digital mockup. Arrange posters to create visual interest through mixed sizes and orientations while maintaining symmetry or intentional asymmetry. Use the 57-inch rule as your center reference point. Space posters 2-3 inches apart for cohesion. Use command strips or poster clips for damage-free hanging, especially in rentals. Choose a unifying element like consistent matting, frame color, or a shared color palette from the posters themselves. Step back frequently to assess balance and adjust as needed. This arrangement method works for both framed and unframed posters.
This article was written using GrandRanker